What Hardware to Mount TV: A Practical DIY Guide
Learn the essentials of mounting a TV safely, including hardware, wall types, VESA patterns, and installation steps. This practical guide from The Hardware helps DIYers choose the right fasteners, brackets, and setup process.

Identify your TV’s VESA pattern and weight, then select a compatible wall mount and screws. This guide walks you through choosing the correct brackets, anchors, and fasteners, plus safety checks and alignment steps to ensure a secure, long-lasting mount.
Why the Right Hardware Matters for TV Mounting
Choosing the correct hardware is not just about aesthetics; it’s about safety, longevity, and performance. The weight of your TV, the type of wall, and the mounting location all influence which screws, brackets, and anchors you should use. Using the wrong fasteners can slip, shift, or pull out, causing damage or injury. According to The Hardware, starting with the TV’s VESA pattern and the wall’s structure sets a solid foundation for a secure mount. A careful selection process reduces wobble, improves heat dissipation, and simplifies cable routing over the life of the installation. This section explains how to think through those decisions before you buy any equipment.
TV and Wall Compatibility: What You Need to Check
Before you pick a mount, confirm two essential compatibility factors: the TV’s weight and its mounting pattern, and the wall’s ability to support a bracket. Check your TV manual for weight limits and VESA dimensions, then examine the wall structure (studs, masonry, or engineered wood panels). If the wall can’t support the weight with standard screws, you’ll need reinforcement or a different mounting strategy. Understanding these constraints up front prevents late-stage changes that can derail a project and protect occupants from accidental shifts.
Understanding VESA Patterns and Weight Ratings
VESA is the standardized square or rectangular hole pattern on the back of most TVs. It determines which mounting plate will fit your set. Alongside pattern size, weight ratings tell you which wall mount bracket is capable of supporting your TV. Most mounting kits list compatible VESA sizes and weight ranges; never exceed a mount’s published capacity. When in doubt, choose a higher weight rating within your budget to accommodate future upgrades.
Mount Styles and What They Require
Mounts come in several styles: fixed, tilting, and full-motion (articulating). Fixed mounts are the simplest and lie flush against the wall, ideal for glare-free viewing and compact spaces. Tilting mounts add a slight angle to reduce glare or accommodate wall obstructions. Full-motion mounts offer horizontal reach and rotation but require sturdier wall support due to added leverage. Each style has different screw patterns and plate sizes, so verify compatibility with your TV and wall before buying.
Screws, Plates, and The Right Fasteners
The backbone of a secure mount is the right screws and mounting plate. Use the screws that come with the wall plate or those explicitly recommended for your TV and bracket. In most cases, you’ll need long screws (lag bolts or machine screws) that reach into the stud or solid backing without bottoming out. Always check the mounting kit’s instructions for thread size and length, and use washers as needed to distribute load evenly. Remember: incorrect screw length can damage the TV or the wall.
Wall Types: Drywall, Masonry, and Reinforcement
Drywall alone cannot hold heavy TVs; you must anchor into studs or use appropriate masonry anchors for brick or concrete walls. For drywall, locate two studs and drive lag screws through the mounting plate into the studs for maximum security. For masonry walls, use a hammer drill with a masonry bit and install concrete anchors compatible with your bracket screws. If you have hollow walls or irregular surfaces, consider additional reinforcement or mounting into a backing board. Always follow local building codes for safety.
Tools, Measurements, and Safety Basics
Plan to use a level, tape measure, stud finder, drill/driver, and appropriate bits. Measure the TV’s center height at eye level for comfortable viewing; mark mounting locations precisely before drilling. Wear safety glasses and have a helper to manage the TV during installation. Safety first means double-checking all fasteners and testing the mount’s load capacity with a gentle shake before final cable management.
Planning Layout: Height, Cable Access, and Accessibility
Choose a mounting height that aligns the screen with your primary seating position, typically centered around eye level. Plan for cable access by leaving room for power, HDMI, and other connections; consider in-wall cable solutions if permitted by code. Arrange cables with protective sleeves or clips to prevent wear and keep the installation clean. A thoughtful layout reduces the need for re-work later and makes future upgrades easier.
Common Mistakes and How to Avoid Them
Common errors include mounting on single drywall anchors, failing to locate studs, and using screws that are too short. Always verify stud locations, use the correct screw length, and respect the mount’s weight rating. Rushing the process can lead to misalignment, TV tilt, or even falling hardware. By following the manufacturer’s instructions and the safety checks outlined here, you minimize risk and maximize long-term reliability.
Tools & Materials
- Stud finder(Locate wall studs for secure mounting; do not rely on drywall alone for heavy TVs.)
- Measuring tape(Accurate height and hole spacing; mark measurements before drilling.)
- Level(Ensure the mounting plate is perfectly horizontal to avoid tilt.)
- Drill/driver with assorted bits(Drill pilot holes and drive screws with appropriate bit size.)
- Socket wrench or hex/key set(Tighten mounting screws to manufacturer-specified torque.)
- Screw assortment and wall anchors(Use screws that match the wall type and mount plate; masonry anchors for brick/concrete.)
- Wall mounting bracket (VESA compatible)(Check TV’s VESA pattern and weight rating.)
- TV mounting screws (from wall plate kit)(Use correct thread size and length; use washers if needed.)
- Pencil and level of safety gear(Mark locations and wear safety glasses; gloves recommended.)
- Cables and cable management(Plan and organize HDMI/Power cables; consider in-wall solutions where permitted.)
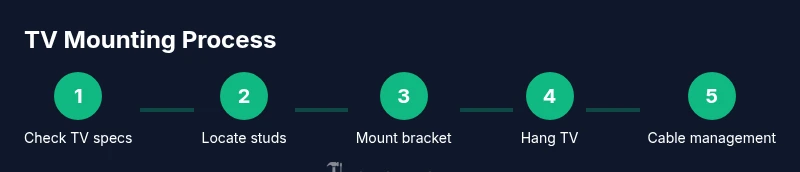
Steps
Estimated time: 60-120 minutes
- 1
Verify TV specs and mount compatibility
Review the TV’s VESA pattern, weight, and the wall mount’s weight rating. Confirm that the bracket’s mounting holes align with the TV and that the wall can support the load. This upfront check prevents wasted effort and ensures a safe install.
Tip: Double-check the TV’s manual for the exact VESA size and weight limit. - 2
Find studs and establish mounting height
Use a stud finder to locate studs behind the drywall. Mark the stud centers at the desired mounting height, ensuring the center aligns with your seating position for comfortable viewing.
Tip: Aim for the TV center around eye level when seated. - 3
Attach wall bracket to wall studs
Pre-drill pilot holes, then drive lag screws directly into the studs through the wall plate. Use a level to keep the plate square and secure each fastener firmly.
Tip: Use at least two screws per stud for stability. - 4
Attach mounting plate to the TV
If your TV requires a mounting plate, attach it evenly to the TV’s back with included screws. Use washers if specified and avoid overtightening to prevent panel damage.
Tip: Keep screws organized and match them to the TV and plate kit. - 5
Hang TV on wall plate and align
With a helper, lift the TV and slide the mounting plate onto the wall bracket. Check alignment and level, then secure the TV per the bracket’s instructions.
Tip: Have a spotter to prevent the TV from slipping during mounting. - 6
Cable management and safety checks
Route cables neatly, secure them to the wall, and verify the TV’s balance after wiring. Test power, input switching, and the mount’s remaining secureness before finalizing the setup.
Tip: Avoid pinch points and ensure power cords are not strained.
FAQ
Do I need to mount a TV on studs?
For most televisions, mounting into wall studs provides the strongest support. If studs aren’t aligned with your preferred location, you may need reinforced backing or masonry anchors designed for your wall type.
Yes, mounting into wall studs is usually the strongest option; use masonry anchors only if studs aren’t available and the wall type allows.
What if there are no accessible studs where I want to mount?
You can use load-rated masonry anchors or toggle bolts designed for your wall material, but ensure the mounting bracket’s weight rating is sufficient and that anchors are installed per manufacturer instructions.
If there are no studs, you’ll need proper anchors rated for your wall and TV weight, installed exactly as specified.
What is VESA and how do I check it on my TV?
VESA is the standardized hole pattern on the back of most TVs used to attach mounting plates. Check the TV manual or measure the distance between hole centers to determine the pattern.
VESA is the standard mounting pattern; you’ll need to match it with your wall mount.
Can I mount a TV on brick or concrete walls?
Yes. Use masonry anchors and a drill with a masonry bit to create holes for the mounting screws. Ensure anchors are rated for the TV weight and meet local building codes.
Yes, brick or concrete walls work with the right masonry anchors and a masonry drill.
How high should I mount the TV for comfortable viewing?
A common guideline is to center the screen around eye level when seated, typically 42–46 inches from floor, depending on seating distance and room layout.
Most people like the screen at eye level for comfortable viewing; adjust slightly based on your couch and distance.
Do I need an electrician to run power behind the wall?
In-wall power kits can be used where code allows, but improper installation can be hazardous. Check local codes and consider professional assistance for in-wall wiring.
Power behind the wall is a code-sensitive task; consult local rules and consider a pro if unsure.
Watch Video
Main Points
- Verify TV compatibility (VESA and weight) before buying hardware.
- Mount into studs or solid backing for safety and stability.
- Use the correct screw length and torque per manufacturer guidelines.
- Plan layout for eye-level viewing and accessible cable routing.
- Test the mount with gentle pressure before finalizing cable management.