How to Tell if Hardware Transcoding Is Working in Jellyfin
Learn how to verify hardware transcoding in Jellyfin, interpret playback indicators, review logs, and troubleshoot driver and configuration issues to ensure smooth video playback.

To tell if hardware transcoding is working in Jellyfin, look for hardware-accelerated indicators during playback, check the server activity log, and compare CPU usage with and without hardware decoding. Test various file formats and bitrates to confirm Jellyfin switches from software to hardware decoding when available; adjust settings if needed.
What hardware transcoding means for Jellyfin users
According to The Hardware, hardware transcoding is the process of offloading video decoding and sometimes encoding tasks from the CPU to a dedicated hardware accelerator like a GPU or a dedicated media encoder. When it works, you’ll notice smoother playback with fewer dropped frames and lower CPU usage on the server. This is especially valuable when multiple clients stream simultaneously or when clients request high-resolution feeds. Understanding the difference between software and hardware decoding helps you optimize your server and avoid unnecessary strain on the host machine. The goal is to maintain consistent playback quality while keeping the server responsive for other tasks such as metadata fetching or client handling. By confirming that Jellyfin leverages hardware acceleration, you can extend hardware life and improve energy efficiency over time.
How Jellyfin uses hardware decoders
Jellyfin can utilize hardware acceleration if a compatible decoder is detected on the host system and if you have enabled hardware acceleration in the server settings. The system will delegate decoding to the GPU or dedicated encoder whenever the media and container formats allow it. This means certain codecs and container combinations are more likely to be accelerated than others. If the media falls into a format Jellyfin cannot accelerate, it will fall back to software decoding, which increases CPU load and can impact performance on busy servers. Ensuring correct driver installation and a compatible FFmpeg build is essential for reliable hardware transcoding.
Indicators that hardware transcoding is active during playback
Look for explicit indicators in the Jellyfin client or dashboard that show “hardware” or “accelerated” decoding. Common signs include reduced CPU usage on the server during playback, a note in the playback stats confirming hardware decoding, and the absence of software decoding messages. Some clients display a small CPU/decoder badge when hardware acceleration is in use. If you monitor the server’s system resources during playback and consistently see low CPU usage while high-resolution streams play smoothly, that’s a good sign hardware transcoding is active.
Verifying through the Jellyfin dashboard and logs
Open the Admin Dashboard and navigate to the Transcoding or Streaming section. Enable verbose logging temporarily to capture transcode events. During playback, observe the Transcoding messages: a hardware-accelerated line will indicate the specific decoder (e.g., Intel Quick Sync, NVENC/NVDEC, or other supported accelerators) being used. Cross-check the logs with the media’s codec and container details. If the log shows software decoding, re-check the FFmpeg configuration, driver status, and whether the chosen format can be accelerated. Regularly saving a playback session to logs helps you identify patterns and misconfigurations.
Common mistakes that hide hardware transcoding
Many issues hide behind misconfigured Jellyfin settings, missing or incompatible drivers, and outdated FFmpeg builds. Common culprits include enabling software fallback globally, selecting a transcoding preset that disables hardware acceleration, or running Jellyfin on a system without a supported GPU/accelerator. Some containers use codecs that aren’t supported by hardware decoders. Always confirm that the hardware is recognized by the OS, that the correct FFmpeg binary is installed, and that Jellyfin’s player profile is set to prefer hardware acceleration when available.
Step-by-step verification workflow (narrative)
A practical approach starts with validating hardware support on the host (GPU/codec availability), then enabling hardware acceleration in Jellyfin, followed by a controlled playback test. If the player shows hardware decoding and CPU usage drops, you’ve confirmed working transcoding. If not, repeat the checks on drivers, jellyfin configuration, and media compatibility. Finally, document what works for different formats so future tests are faster. This workflow scales with server load and client variety, ensuring consistent results across devices.
Testing across formats and devices
Test a range of file formats (e.g., MP4 with H.264, MKV with HEVC) and bitrates to determine which combinations Jellyfin can accelerate. Different clients (mobile, desktop, smart TV) may trigger different decoding paths. It’s common for newer formats or high-bitrate streams to leverage hardware decoding, while legacy or unusual codecs may not. Document the results per device so you can adjust server-side profiles or file availability accordingly. Regular tests help you understand coverage and limit edge-case failures.
Performance expectations and limitations
Hardware transcoding should reduce CPU load and sustain smooth playback under load, but it’s not a universal cure. The actual improvement depends on the GPU/decoder, the FFmpeg build, media codecs, and the number of concurrent streams. Some tasks may still require software fallback if the hardware is saturated or if the content uses unsupported profiles. Plan for muscle memory by keeping a few tested configuration templates ready, and monitor system metrics to catch drift as updates arrive.
Tools & Materials
- Jellyfin server with admin access(Must have admin privileges to adjust transcode settings)
- GPU/accelerator hardware(Supported decoders: Intel Quick Sync, Nvidia NVDEC/NVENC, AMD equivalents)
- Up-to-date FFmpeg build with hardware support(Install from official repos or vendor packages that include hwaccel codecs)
- Test media in multiple formats(Include 1080p and 4K samples if available)
- Client device(s) for playback(Smart TV, mobile, or desktop apps)
- Administrative access to OS and drivers(Check driver installation status and OS compatibility)
Steps
Estimated time: 60-120 minutes per round of tests
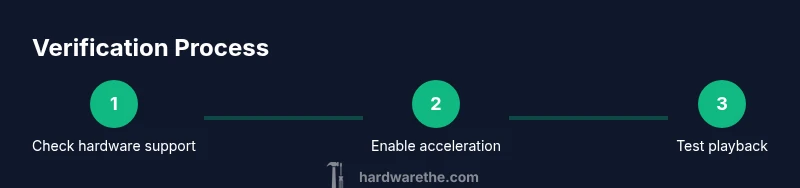
- 1
Verify hardware acceleration support
Check that the host OS recognizes a capable GPU/accelerator and that the FFmpeg build includes hardware codecs. This step reduces downstream guessing and ensures Jellyfin can select hardware decoding when possible.
Tip: Run a quick system check and confirm device visibility before touching Jellyfin settings. - 2
Enable hardware acceleration in Jellyfin
In Admin Dashboard > Playback > Transcoding, enable the hardware acceleration option and select the appropriate hardware (e.g., Intel Quick Sync or NVIDIA NVENC/NVDEC).
Tip: If you’re unsure about the available accelerators, check the system report or FFmpeg capabilities. - 3
Choose a test media file
Pick a file that matches a known hardware-accelerated codec and container (e.g., H.264 MP4). This ensures you’re testing a supported path.
Tip: Use a short clip to reduce wait time during tests. - 4
Play the test media and observe indicators
Start playback on a client, then check for hardware decodable indicators in the playback UI or logs.
Tip: If you don’t see an indicator, switch to a format with confirmed hardware support. - 5
Compare CPU usage
Monitor the server’s CPU load during playback with and without hardware decoding enabled.
Tip: Record peak CPU usage for a consistent set of tests. - 6
Review logs for transcode path
Open Jellyfin logs and search for transcode events to confirm the decoder type used.
Tip: Filter for 'Transcoding' lines and verify hardware decoder names. - 7
Test additional formats and devices
Repeat with different codecs/BPP and on multiple clients to validate broader hardware acceleration coverage.
Tip: Document which formats work best on each device. - 8
Document results and adjust profiles
Summarize outcomes and tweak transcoding profiles to favor hardware acceleration where possible.
Tip: Keep a reference profile for future Firefox/Chrome/Android clients.
FAQ
What counts as evidence that hardware transcoding is active in Jellyfin?
Evidence includes UI indicators showing hardware decoding, logs that name the hardware decoder, and noticeably lower server CPU usage during playback. Some clients also display a hardware badge when accelerated decoding is in use.
Look for hardware decoding indicators in the UI, check the logs for the specific hardware decoders, and expect reduced CPU usage during playback.
How do I enable hardware acceleration in Jellyfin?
Open the Admin Dashboard, navigate to Playback or Transcoding, and enable hardware acceleration. Select the hardware decoder that matches your system (e.g., Intel Quick Sync or Nvidia NVENC/NVDEC). Ensure your FFmpeg build supports the chosen codec.
Go to the Admin Dashboard, turn on hardware acceleration, pick your hardware, and confirm FFmpeg supports it.
Which codecs are typically hardware-accelerated?
Hardware acceleration commonly covers common codecs like H.264 and HEVC (H.265) in many GPUs. Availability depends on your hardware and FFmpeg build, so verify in your environment.
Most GPUs accelerate H.264 and HEVC, but it varies by device and FFmpeg build. Check your setup.
What if Jellyfin shows software decoding even with hardware enabled?
This can happen if the media format isn’t supported by hardware decoders, the hardware is busy, or the driver/FFmpeg setup isn’t correct. Check logs, update drivers, and test alternate formats.
If you still see software decoding, verify format support, update drivers and FFmpeg, and try a different file.
Can hardware transcoding improve performance on a low-end system?
Yes, but results depend on the exact hardware. An older GPU may help, but not as much as a modern accelerator. If performance is still poor, consider lowering resolution or bitrate for remote clients.
A modest GPU can help, but it’s not a magic fix for all workloads. Adjust settings accordingly.
Watch Video
Main Points
- Verify hardware support before enabling acceleration.
- Use the Jellyfin dashboard and logs to confirm the decoding path.
- Test across formats and devices to ensure broad hardware coverage.
- Monitor CPU usage to quantify benefits of hardware transcoding.
- Document configurations for future maintenance.